Friday, December 30, 2011

Time to wrestle the monster

Ok. So ignoring it isn't getting the job done. I keep taking furtive peeks down the backyard, but everything still looks exactly the same. It seems that the 'helpful elves' thing is a crock of shit after all. Apparently I'm the 'only' person who can make something happen. Yeah, I get it.

With this in mind, I have made some lifestyle changes and readjusted some priorities. Much has happened throughout the last year, which kept me way too busy to think about the poor canoe (other than the constant fantasies about eventually paddling/sailing her). But that's all history now. My studies are on hold, and won't be resumed until this baby is finished and in (hopefully not under) the water. Other 'life' issues are now at a point where they can be left on the back burner, and just monitored for a while. Time to focus my efforts again.

A couple of days ago, I uncovered the old girl and gave her a good clean out. Everything seems the same as when I covered her up last February.


Because the idea of whimping out (i.e. getting someone else to do my scarf joints for the gunwales) really grates on my nerves, I've decided to see if there is any way that I can do them myself. Yesterday I cleared a space on our verandah and laid out my gunwale stock. After much mental gymnastics, I came to the conclusion that I'm going to have to go see my mate (Rick) and beg for some more longer lengths. He's already done so much to help, that I'm reluctant to ask for more, but I have little choice. I have enough shorter lengths to suffice, but it would mean lots of scarf joints, resulting in a weaker structure (and lots more work/opportunity for stuff ups). At least I'll have enough longer lengths to be able to do the inner gunwales for the time being. I just need to ascertain an 'idiot-appropriate' technique for the scarf joints.


A search of the internet uncovered a likely option. It involves clamping a guide to the face plate of a stationary sanding disc, and simply sliding the stock into it until the appropriate bevel is achieved. Sounds simple.

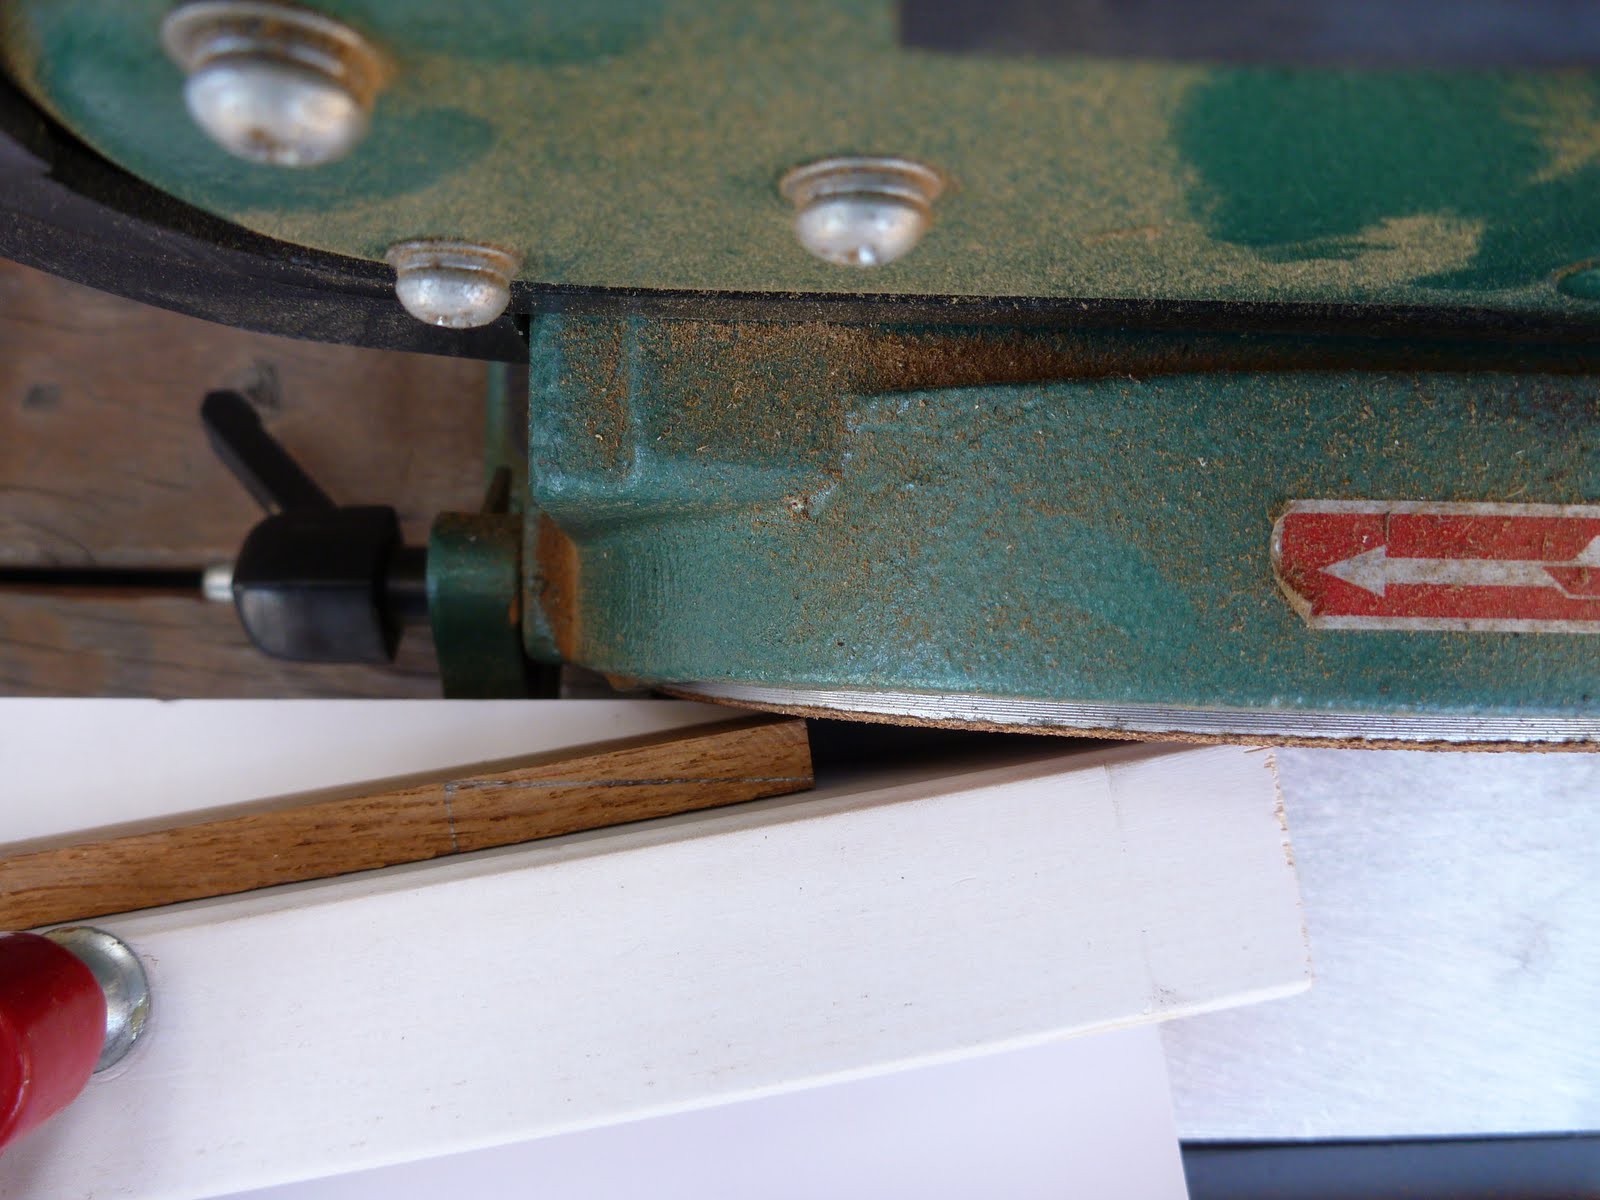
I dug my trusty sanding machine out and set it up accordingly. Mindful of the necessity of accuracy, I spend much time trying to get the plate as level as possible. The result wasn't perfect, but as close as I could get it.


Then I measured out my scarf angle on the stock. I used a shorter length of the actual teak stock cut in half, since I'm hoping to get more anyway. The bevel should be cut to a minimum of 8:1, but I want maximum strength (and simplicity), so I opted for a 10:1 angle.


Then measuring out the angle with a plastic protractor, I transferred the angle to a piece of paper....


...then clamped my guide along the line. Then it was time to tentatively try my stock for real.


Bugga! Bastard! Bum!


It seems that those little inaccuracies add up to really screw a job. Righto, how about trying to level it out properly by eye? How hard could it be?


Hmm, that hard huh? Ok, maybe time to change tack. After a lot of swearing, tool throwing and soul searching, I had a brainstorm. I remembered I had a chisel sharpening guide, that I bought years ago (foreseeing the grand day that I might become a boatbuilder.....pwhaaaahaaahaahaa). What if I could set it up directly on the stock, and use it to control the bevelling?

After much fiddling around, what I came up with looked like this.


I tried it on the running belt part of the machine, but it was a bit too short, vibrated heaps and I worried it would munch the guide roller away in no time. I also didn't tighten the thumbscrew enough, so it started to skew diagonally.

I reset the angle and fully tightened the screw again. I also dug out the torture board, that I'd experimented with ages ago. With the board's longer length, I was able to slowly ride the assembly back and forth across the sandpaper with much more control.


By George, I think I've got it.


Much more betterer. I reckon this is going to be the way for me to go. Mind you, I might have to reverse which bits get clamped, since the final stock will be so much longer. But at least I should be able to achieve repeatable, accurate bevels for my scarf joints now. Phew!


Wednesday, February 23, 2011

Scarf Musings

First up, I want to apologise for the lack of posts here. I know how annoying it can be when you have an occasional look at a blog and there's been no action for a while. Poor old thing is sitting out there under the tarps again. The build has been on the back burner since February, due to overwhelming work/family/study commitments, but I hope to resume work on her shortly.

In my defense, I did spend quite a bit of time having a go at scarfing the teak for the gunwales, but my experiments haven't gone well. My excitement in finally being up to working with wood again has been thwarted by inexperience. Cutting scarf angles to an 8:1 ratio and just epoxying them together sounds so simple, yet it turns out that it is also so incredibly easy to get wrong. I've only got just enough Teak for the gunwales, so after reading up on the process in various books, I started experimenting on scrap bits of timber.

I tried cutting the bevels with a saw, chisels, planes, etc., but I kept stuffing it up. I spent ages messing around with my table/drop saw, but the fences can only be adjusted to 45 degrees (my bevels require way more). I tried just sanding them on my disc/belt sanding station but I couldn't get it very accurate (mind you, I was using old hardwood fence palings). Finally I decided to set up a jig (like a miter box) using more scrap timber. This had the parallel advantage of also being able to experiment with using my epoxy mixed as a glue. It looked like it could have worked, except that some idiot made the jig too short.... (I'm not naming names). The jig did prove useful during my tantrum-like destruction testing. The epoxy glue joints appear to be bullet-proof. The wood fibers came away instead of the glue letting go, so I'm quite happy that it should hold up OK in the boat (e.g. the stringers supporting the seats).


At that point, I retreated and adopted the tactic of avoidance. This hasn't seemed to have helped though, so my current plan is to seek the help of someone with a bit of competence. I reckon I might even just pay someone to cut the scarfs for me. It's imperative that these bits are done right, since they're going to be structural items and they really MUST be left varnished.

Anyway, if you come back for another look in a few weeks, hopefully you will see a bit more progress.

Tuesday, February 1, 2011

Final Fill-Coat and Gunwale Timber

With the end of all this fiber-glassing nonsense within sight (at least for a little while), I was pretty excited when I started on the fill-coat of epoxy last Friday. I got up early, setting up my bigger tarp as a tent before breakfast (was to be another hot day). Then, after a quick breakfast, I happily got into it.


Firstly, I went around the sheer and trimmed all of the excess glass cloth. I found that a Stanley knife (and a bit of care) worked the best. I also cut out any big blisters and made small holes in some smaller ones. Then I gave everything another sand, vacuum and wipe down.


Then I started mixing and applying the epoxy fill-coat from the bow. Flushed with my earlier successes with the glass cloth, I felt confident in my capacity to bend the peel-ply to my will. Oh, the naivete. Let's just say that the peel-ply had other ideas (see photo below).


After messing around with it for ages, I finally discarded that foul stuff and just focused on filling the weave as best I could. I cut out small patches and fitted them into the holes of the bigger blisters, whilst the smaller ones got heavier doses of epoxy (in the hope of flooding them with resin). It all seems to have turned out OK, if a bit rough. The texture of the weave is still obvious, but I reckon I'm going to use a bit of the fairing powder on the inside to smooth it out properly when the time comes. In any case, I think that this hull is now as good as I can get it, and it's pretty much ready for the interior fitting out.

Since today is my one day off, I wanted to make the most of it. I had called my mate (Rick) yesterday, to see if his earlier offer of some gunwale timber was still available. He was as good as his word (as always), and said to lob out to his factory early today if I wanted to catch him. I arrived right on time and he pointed me at some magnificent, straight grained, quarter sawn Teak, which was almost exactly the dimensions I needed. He loaded me up with all that I needed, and waved away my offers of payment (shit I'm going to owe this bloke, big time).

Once I got this lot home, I had a bit of a think about it and worked out whether or not I have enough (turns out just about perfect).


Then I set up my trusty convertible table/drop saw in the shade (it's ridiculously hot today), setting the fence to the right width. Then I carefully ripped each length individually, leaving me with a stack of almost correctly sized Teak strips for my inner and outer gunwales (plans specify 10mm x 40mm, whilst this stuff is 9mm x 37mm).


Beautiful. This is going to look shit-hot when it's been varnished.


These bits still have to be scarfed into the correct lengths, then I can fit the inner and outer gunwales; quickly followed by the bulkheads, ring-frame, stringers, seats and then decks. I hope I can get through these jobs quickly now because my next study period is looming again (end of February), and I know that I'm going to get slowed right down yet again then.

Thursday, January 27, 2011

Interior Glass at Last

Last weekend I continued as planned by giving the interior a final sand, vacuum and wipe down. Satisfied that I had as perfect a surface as possible, I happily threw myself at laminating the first strip amidships. I was pretty confident, since the test panel had turned out brilliantly.

The initial coat of epoxy went on easily enough, but when I attempted to apply the strip of fiber glass cloth, all of the horrors from my earlier laminating of the hull's exterior came flooding back. The cloth would pull this way and that. Folds would develop in one place, and once sorted out, the cloth suddenly wouldn't reach the gunwales anymore. I'd fiddle around and swear at it until it eventually seemed to behave itself, when suddenly one of the clamps would fly off and a great fold of cloth would peel away from the surface, forcing me to start all over again. I tried to use the peel-ply, thinking that it might help to tame the unruly glass cloth, but it only made matters worse. The wispy light fabric of the peel-ply took on characteristics similar to normal glass cloth on crystal-meth., and when it got near it's partner in crime, they appeared to rejoice in an orgy of mischief. After wrestling with these two evil materials for some time, I decided to abandon the peel-ply and concentrated my fight solely on the glass cloth (divide and conquer). Somehow, I finally managed to force it into some semblance of order. This process took so long (and taxed my mental/emotional faculties so much), that I couldn't get any further that day. This photo shows the result. Slightly less ideal than my test panel, but should be ok.
(Score, Me:1 - Glass Cloth: nil)


The next day, I warily approached the canoe with a mixture of respect and disgust, but also determination. This bastard wasn't going to beat me. This time I was going to take it easy, work strategically and show no signs of weakness. It was going to be a hot day, but dry. I thought about trying to string up a tarp, but because I wanted to come to grips with my enemy quickly, I instead decided to attack straight away.

This time, so as to ensure absolute control of this mongrel fabric, I opted to use the 'dry method' of laminating. This means not applying an initial layer of epoxy first, then laying the cloth over this, followed by applying subsequent applications of epoxy (aka; 'wet method'). By using the dry method, I intended to clamp the recalcitrant glass cloth in place, whilst slowly and methodically assaulting it with the epoxy. This seemed to work pretty well. The glass cloth did make a couple of feints and counter attacks, but through effective flanking maneuvers and by maintaining a steely focus, I finally emerged victorious. Feeling quite proud of myself, I bowed smugly to my foe and retired for the day (it was pretty hot, after all).

At the end of the day I came back to cover up the hull for the night and discovered a slight flaw to my tactics. By leaving the wet lamination in the direct sun (something which pretty much everybody says not to do - and in hindsight seems pretty dumb anyway), the surface must have heated up too much, causing air to bubble up from the surface. This left lots of big blisters, which I'm now going to have to sort out.
(Score, 1 - all)


The next time, I decided to learn from my mistake. I dug out my army hootchie (cammo fly-sheet) and strung it up over the next section with occy-straps. Then I proceeded with the same clamping/dry technique that seemed to work so well before.


This time I was much more successful. This is more like it, although I still loath fiber-glassing.
(Score, Me: 2 - Glass Cloth: 1)


The next day, I assaulted the bow section. With my trusty hootchie in place again, I followed Gary's advice about laminating each side separately, and applying a strip to cover the join. A bit fiddly, and the cloth still tried the odd rebellion here and there, but overall it worked very well.
(Score, Me: 3 - Glass Cloth: 1)


Today it was the stern section's turn to get laminated. Same again, another victory.
(Game, Set and Match, bitch!)


So I now have the whole interior initially laminated. There's a little bit of rework yet to be done on the blisters, and the whole lot needs a decent fill coat of epoxy to cover up the stitching of the cloth, which is still sitting proud of the surface. I'm wondering if I might be able to use the pee-ply on this fill coat, so I don't end up using too much epoxy. Reckon I might give Pacific Boatcraft a call tomorrow and ask them. Hopefully I'd be able to tame that foul fabric as well (bring it on).

Monday, January 17, 2011

Interior Glassing Preparations

Even with the constant threat of bad weather last week, I was still able to get the canoe pretty well ready to receive the interior lamination of fiber glass. First I completely sanded and cleaned up the epoxied interior. The stern fillet needed a bit of a re-work because of the runny mix used initially, so I mixed up another small batch and got it all sorted out. It's still not very pretty but at least it should be OK for the glass.


Then I set up my new roll of Bi-Axial cloth and started measuring out the lengths needed. With the traumatic memories of my earlier experiences in glassing the exterior still fresh in my mind, I have instead decided to apply the glass in strips cross-wise this time. This should mean that I'll only have to deal with a small area at a time, and ought to have lots less trouble getting the bloody cloth to behave itself. I started amidships and worked toward the ends (the widths seems to fit just right). There will be a slight overlap between each strip, but I'm hoping this will add to the transverse strength. Once these strips were all cut out, I stacked them neatly on my bench and covered them over.


I'm a bit concerned about the much heavier cloth (over 400gm - twice what was used on the exterior), specifically whether or not I'll be able to wet it out enough. So I cleaned up one of the earlier test panels (the really bowed one) and did a trial run on it. I also used some peel ply, since I'm planning to have a go at using that as well in the proper lay-up. It seemed to go well, hope it turns out OK.


I'm hoping that I get a good break in the weather tomorrow (predicting rain again). Man, what I'd give to have a decent shed to work in. It'd be so cool to get past all this fiber glassing crap, and finally get onto some fun stuff (gunwales, bulkheads, etc).

Saturday, January 8, 2011

Fillets and Interior Soak Coat Done

Last Tuesday I was able to get the bow and stern fillets done. After vacuuming/wiping down the inside of the hull, a soak coat of epoxy was run along the whole keel from the bow to the stern. Then I made up the filler/glue powder mixture for the fillets and had a go at running the actual fillets. I optimistically thought I'd be running a fillet down the length of the keel as well, but that turned out to be not very practical, so I just stuck with the bow and stern ones.


The first fillet (in the stern) was a bit runny so it sagged a bit, but it should be OK.


I made the mix for the bow one much thicker, but this time I was unable to get it very smooth.


Today I went in to my local fiber glass supplier in Gosford to suss out some glass for the interior. I've been worrying about possible compromise to the canoe's structural integrity, from using such thin cedar (and then sanding it even thinner). I ended up buying some Bi-Axial cloth, which is much thicker than the 200gm cloth that I used on the exterior, as well as being properly sewn together. I'm now satisfied that the hull should be plenty strong when finished.

This afternoon I went out and applied a decent soak coat of epoxy to the rest of the interior. I'm hoping to be able to start fiber glassing the inside tomorrow, although they are predicting lots of rain. If I can't get the glassing done tomorrow, then I'll have to wait until later next week.