Monday, June 10, 2013

And, I'm Back

Well, its been a while. I have made a little bit more progress, but nothing spectacular. In my defence, it has been a pretty hectic year & a half. 

In that time, I tried to get a business off the ground. Unfortunately, after much activity and positive initial indications, it didn't really get going. At least we weren't yet very heavily committed financially, so it didn't destroy us. 


My next big step was taking a voluntary redundancy from my job in Sydney. A pretty big step, but I was just so sick of the long hours and full-on commute. Plus I was ready for a change. I figured I'd be able to pick up another job reasonably quick, but I guess I underestimated the global financial shenanigans we've been enjoying lately. In the end, I was out of work for about ten months. I've now picked up a local job, and have been loving the concept of only living 20 minutes away form work. Its 'chimp' work, the pay is crap, and I've been working six days a week for the last few months but at least its work. It'll do until I can figure out where my next career steps will take me. 

 You would think with so much time on my hands that the canoe would be finished by now. Baaaahahaha, the naivety. No, I had many distractions along the way (as usual). As I said before, I did manage to get a bit done on the canoe. I finished and installed my dreaded inner gunnels, and planed the rail edges nice and fair. I made up breast-hooks for the bow and stern, to reinforce these points. I even got my bulkheads finished and ready for installation (all they need now are inspection ports and bungs). I tried to update this blog with my activity, but it wouldn't let me access/post anything for ages. They seem to have upgraded the system now, which is a relief. Hopefully it will all work ok now. 

Anyway, here's a couple of quick piccies.....


Pretty paltry progress I know, but as I said, I did have other distractions. Apart from full time job-searching, I also went out and bought a brand new motorbike (Yamaha XT660Z Tenere). Of course, there were a few little forays out into the bush too, just to get to know each other.....


Oh, and then there was a three month family holiday around Europe (London, Paris, Amsterdam, Munich, Bern, back to London for Christmas - hire van and visit old friends in Cheshire, whilst driving around Wales, Lakes District and up to Edinburgh). What a blast. Trip of a lifetime. The wife and kids got a couple weeks in the US too, but the American government wouldn't let me into the country, so I missed out on that bit (mongrels). 


Anyway, as soon as we got back last January (considerably fatter and poorer), I got a call about a certain small yacht that I've been lusting after for years (Contessa 26). Long story short, this particular boat was mine if I wanted it. All I had to do was come get it from Sydney Harbour. The timing couldn't have been worse. Given our financial predicament, I would have to be an imbecile to take them up on the offer. It was going to cost about $5000 just to get it ready, transport it here and set it up on stands. With me on financial fumes and no prospects for employment on the horizon, it was a ridiculous notion. Can't be done. 

So, of course, I went for it.....


She's an absolute mess, and EVERYTHING needs repairing/replacing, but she is beautiful. Its going to take me ages and loads of cash to get her back to operational condition, but at least she's mine. As you know, I've finally got a job now, and I've been spending my one day off each week (weather and family commitments permitting) working on getting her cleaned out and ready for the big structural items (osmosis, reinforcing, renewing, etc). At least the cleaning out doesn't cost me money. 

The plan is to get back onto the canoe once the cleaning out stage is completed on the yacht (maybe another month or two). Then I will focus on getting it (the canoe) finished and launched before resuming work on the yacht again. 

IF, of course, life settles down a bit now and doesn't throw me any more curve balls for a while. 

Thursday, January 5, 2012

Inner gunwales continued

Yesterday I was able to make the bevels for the other inner gunwale. Again, not perfect but as good as I could get them. Predictably, the last one was a bastard but I won in the end.

Today was finally D-day for joining the lengths. I spent some time sussing out how I was going to handle the job first. The only place under cover where I could do it was on our back verandah. I stuck some scrap timber strips in the gaps along one of the grooves in the decking, so as to (hopefully) make them as straight as possible. I also used a couple of old doors (weighted down with some of my gym weights) for either side of the scarfs, to give some clamping stability.


Well, at least the dry test run looks like it'll work.


I tried to chock the ends as best as possible too.


Deep breath, here we go. After laying down some plastic, I mixed up a little bit of epoxy with the additive which makes it more runny. I applied this to the bevels, allowing it to soak into the end grain a bit.


Then I mixed in some of the glueing/filling powder and applied it liberally to the surfaces, and matched them up. Bit messy, but hopefully I've got them aligned properly. It's a bit hard to see once the epoxy and plastic is all around, but I reckon it's ok. I fired a staple into the top joint to stop it from sliding, and covered it up.


Because the job is now laying across a high-traffic area, I took some steps to increase visibility. I'd hate to have to violently eliminate a member of my family for tripping over it and wrecking the joints.


I'm going to leave it like this until Saturday, when I will hopefully be able to clean them up and fit them into the hull. This has been a big mental hurdle for me. It is so good to now be moving again on this project. Hopefully I will be able to get some real momentum going again.


Monday, January 2, 2012

First scarfs

Today I finally got around to making the first of the scarf joints for the inner gunwales. I set up under our big Jacaranda tree (with some cool tunes playing) and started nutting it out.

To save time, and in a gesture toward accuracy, I clamped all four of the lengths together and measured/marked out the bevel angles simultaneously.


I was hoping to bevel two lengths at a time (staggered so that the bevel marks line up), but unfortunately my sharpening guide can only really fit around one strip at a time. Oh well.


Next I needed to work out how far back from the end I'd have to place the guide, so that the correct angle for sanding would be maintained. I used a straight strip of wood to eyeball something approximating decent alignment (should be right, shouldn't it?).


Because the strips are pretty long, I figured I ought to try clamping the strip, and work the torture board back and forth.


I also tried to support the very end as much as I could, since theoretically this edge would be getting more and more flimsy as work progressed.


Long story short, this approach didn't really work very accurately, so I reversed it and tried again.


Still not ideal and a bit fiddly, but much better. I continued as carefully as I could, stopping regularly to check my results. The following picture is what I ended up with.


Again, not overly perfect, but way better than I thought I was going to be able to achieve. The mating surfaces still had a very slight curvature cross-wise, so I used a bit of sandpaper and a timber strip to flatten it out as best I could. The next photo shows the bevels put together.


So after all that, I have my first scarf joint. Not ideal, but should suffice. Bit of a gap here and there, but about as good as I can get it. I'm told that epoxy can be quite forgiving with stuff like this. Hopefully my next scarf (for the other inner gunwale) will be better.

Friday, December 30, 2011

Time to wrestle the monster

Ok. So ignoring it isn't getting the job done. I keep taking furtive peeks down the backyard, but everything still looks exactly the same. It seems that the 'helpful elves' thing is a crock of shit after all. Apparently I'm the 'only' person who can make something happen. Yeah, I get it.

With this in mind, I have made some lifestyle changes and readjusted some priorities. Much has happened throughout the last year, which kept me way too busy to think about the poor canoe (other than the constant fantasies about eventually paddling/sailing her). But that's all history now. My studies are on hold, and won't be resumed until this baby is finished and in (hopefully not under) the water. Other 'life' issues are now at a point where they can be left on the back burner, and just monitored for a while. Time to focus my efforts again.

A couple of days ago, I uncovered the old girl and gave her a good clean out. Everything seems the same as when I covered her up last February.


Because the idea of whimping out (i.e. getting someone else to do my scarf joints for the gunwales) really grates on my nerves, I've decided to see if there is any way that I can do them myself. Yesterday I cleared a space on our verandah and laid out my gunwale stock. After much mental gymnastics, I came to the conclusion that I'm going to have to go see my mate (Rick) and beg for some more longer lengths. He's already done so much to help, that I'm reluctant to ask for more, but I have little choice. I have enough shorter lengths to suffice, but it would mean lots of scarf joints, resulting in a weaker structure (and lots more work/opportunity for stuff ups). At least I'll have enough longer lengths to be able to do the inner gunwales for the time being. I just need to ascertain an 'idiot-appropriate' technique for the scarf joints.


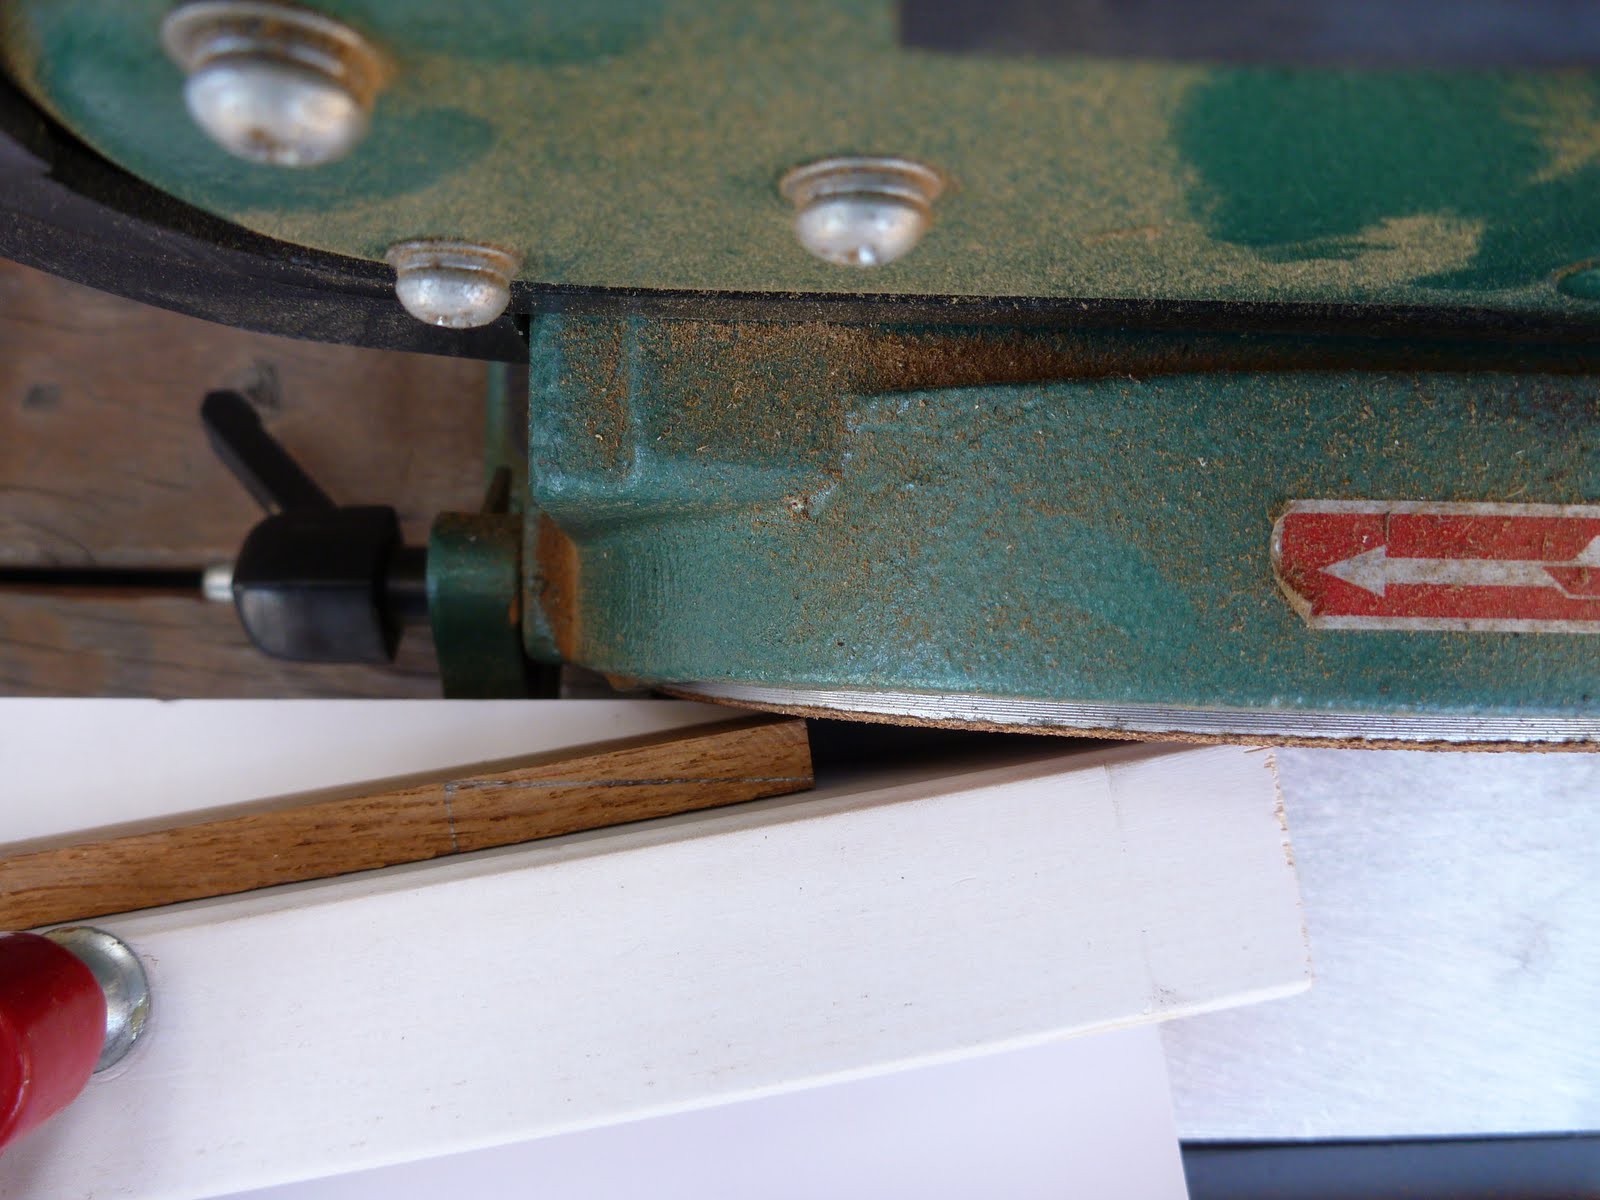
A search of the internet uncovered a likely option. It involves clamping a guide to the face plate of a stationary sanding disc, and simply sliding the stock into it until the appropriate bevel is achieved. Sounds simple.

I dug my trusty sanding machine out and set it up accordingly. Mindful of the necessity of accuracy, I spend much time trying to get the plate as level as possible. The result wasn't perfect, but as close as I could get it.


Then I measured out my scarf angle on the stock. I used a shorter length of the actual teak stock cut in half, since I'm hoping to get more anyway. The bevel should be cut to a minimum of 8:1, but I want maximum strength (and simplicity), so I opted for a 10:1 angle.


Then measuring out the angle with a plastic protractor, I transferred the angle to a piece of paper....


...then clamped my guide along the line. Then it was time to tentatively try my stock for real.


Bugga! Bastard! Bum!


It seems that those little inaccuracies add up to really screw a job. Righto, how about trying to level it out properly by eye? How hard could it be?


Hmm, that hard huh? Ok, maybe time to change tack. After a lot of swearing, tool throwing and soul searching, I had a brainstorm. I remembered I had a chisel sharpening guide, that I bought years ago (foreseeing the grand day that I might become a boatbuilder.....pwhaaaahaaahaahaa). What if I could set it up directly on the stock, and use it to control the bevelling?

After much fiddling around, what I came up with looked like this.


I tried it on the running belt part of the machine, but it was a bit too short, vibrated heaps and I worried it would munch the guide roller away in no time. I also didn't tighten the thumbscrew enough, so it started to skew diagonally.

I reset the angle and fully tightened the screw again. I also dug out the torture board, that I'd experimented with ages ago. With the board's longer length, I was able to slowly ride the assembly back and forth across the sandpaper with much more control.


By George, I think I've got it.


Much more betterer. I reckon this is going to be the way for me to go. Mind you, I might have to reverse which bits get clamped, since the final stock will be so much longer. But at least I should be able to achieve repeatable, accurate bevels for my scarf joints now. Phew!


Wednesday, February 23, 2011

Scarf Musings

First up, I want to apologise for the lack of posts here. I know how annoying it can be when you have an occasional look at a blog and there's been no action for a while. Poor old thing is sitting out there under the tarps again. The build has been on the back burner since February, due to overwhelming work/family/study commitments, but I hope to resume work on her shortly.

In my defense, I did spend quite a bit of time having a go at scarfing the teak for the gunwales, but my experiments haven't gone well. My excitement in finally being up to working with wood again has been thwarted by inexperience. Cutting scarf angles to an 8:1 ratio and just epoxying them together sounds so simple, yet it turns out that it is also so incredibly easy to get wrong. I've only got just enough Teak for the gunwales, so after reading up on the process in various books, I started experimenting on scrap bits of timber.

I tried cutting the bevels with a saw, chisels, planes, etc., but I kept stuffing it up. I spent ages messing around with my table/drop saw, but the fences can only be adjusted to 45 degrees (my bevels require way more). I tried just sanding them on my disc/belt sanding station but I couldn't get it very accurate (mind you, I was using old hardwood fence palings). Finally I decided to set up a jig (like a miter box) using more scrap timber. This had the parallel advantage of also being able to experiment with using my epoxy mixed as a glue. It looked like it could have worked, except that some idiot made the jig too short.... (I'm not naming names). The jig did prove useful during my tantrum-like destruction testing. The epoxy glue joints appear to be bullet-proof. The wood fibers came away instead of the glue letting go, so I'm quite happy that it should hold up OK in the boat (e.g. the stringers supporting the seats).


At that point, I retreated and adopted the tactic of avoidance. This hasn't seemed to have helped though, so my current plan is to seek the help of someone with a bit of competence. I reckon I might even just pay someone to cut the scarfs for me. It's imperative that these bits are done right, since they're going to be structural items and they really MUST be left varnished.

Anyway, if you come back for another look in a few weeks, hopefully you will see a bit more progress.

Tuesday, February 1, 2011

Final Fill-Coat and Gunwale Timber

With the end of all this fiber-glassing nonsense within sight (at least for a little while), I was pretty excited when I started on the fill-coat of epoxy last Friday. I got up early, setting up my bigger tarp as a tent before breakfast (was to be another hot day). Then, after a quick breakfast, I happily got into it.


Firstly, I went around the sheer and trimmed all of the excess glass cloth. I found that a Stanley knife (and a bit of care) worked the best. I also cut out any big blisters and made small holes in some smaller ones. Then I gave everything another sand, vacuum and wipe down.


Then I started mixing and applying the epoxy fill-coat from the bow. Flushed with my earlier successes with the glass cloth, I felt confident in my capacity to bend the peel-ply to my will. Oh, the naivete. Let's just say that the peel-ply had other ideas (see photo below).


After messing around with it for ages, I finally discarded that foul stuff and just focused on filling the weave as best I could. I cut out small patches and fitted them into the holes of the bigger blisters, whilst the smaller ones got heavier doses of epoxy (in the hope of flooding them with resin). It all seems to have turned out OK, if a bit rough. The texture of the weave is still obvious, but I reckon I'm going to use a bit of the fairing powder on the inside to smooth it out properly when the time comes. In any case, I think that this hull is now as good as I can get it, and it's pretty much ready for the interior fitting out.

Since today is my one day off, I wanted to make the most of it. I had called my mate (Rick) yesterday, to see if his earlier offer of some gunwale timber was still available. He was as good as his word (as always), and said to lob out to his factory early today if I wanted to catch him. I arrived right on time and he pointed me at some magnificent, straight grained, quarter sawn Teak, which was almost exactly the dimensions I needed. He loaded me up with all that I needed, and waved away my offers of payment (shit I'm going to owe this bloke, big time).

Once I got this lot home, I had a bit of a think about it and worked out whether or not I have enough (turns out just about perfect).


Then I set up my trusty convertible table/drop saw in the shade (it's ridiculously hot today), setting the fence to the right width. Then I carefully ripped each length individually, leaving me with a stack of almost correctly sized Teak strips for my inner and outer gunwales (plans specify 10mm x 40mm, whilst this stuff is 9mm x 37mm).


Beautiful. This is going to look shit-hot when it's been varnished.


These bits still have to be scarfed into the correct lengths, then I can fit the inner and outer gunwales; quickly followed by the bulkheads, ring-frame, stringers, seats and then decks. I hope I can get through these jobs quickly now because my next study period is looming again (end of February), and I know that I'm going to get slowed right down yet again then.